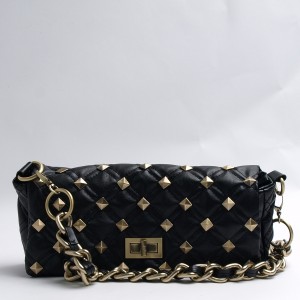
Handbag photography… It may look fancy but I have some easy secrets to take your pictures from amateur to professional in just 4 steps.
Here are my secrets:
- You might be wondering how I get the handles to stand up straight. Here’s my answer: I have a helper…and my helper has fishing line.
- Stuff the bags with tissue paper. This helps fill the bags out and also helps the viewer imagine what the bag will look like when they fill it with their personal items.
- Show the bag at every angle. I shoot front, angle, side, back, and inside. Make sure there are no surprises and that everything is shown. If there is a strap, show it. If there’s an interesting detail, show it.
- Edit your pictures: Even the best product photograph could use a little touch up. Take the time to remove all flaws and brighten the background. This is a digitally enhanced world. Embrace it.
Now with these tips in mind I’m going to show you a shot of the Devon Convertible Clutch sans my 4 secrets. I’m nervous. I feel like I’m about to show you a picture of myself without makeup. 
Well there it is. It’s a great bag but lacking all of the luster without my 4 steps. The background is dreary and distracting, the handles are dragging and with just this one angle I can’t even begin to imagine what the rest of the bag looks like. After viewing this image I’m left with these questions: Are there studs on the back? Does this bag come with an alternative strap? What does the inside look like? Relax. Just add steps 1-4 and…
Viola! You have an irresistible bag with every angle, detail, and strap highlighted to its fullest glory and all of your questions are answered!
Product photography is all about making a product appealing but it doesn’t have to be difficult. If you plan to embark on some handbag photography, keep these tips in mind. You’ll end up with simple and professional pictures that are sure to impress and bring light to the positives of your product.


