Hello! I am Stacie and I am so excited to be writing for the stylish ladies (and gent ;) ) at Handbag Heaven today! I am a writer over at Handbag Heaven’s sister site, Scarves.net, and while I am totally in love with my job researching new scarf ideas, crafty scarf projects, and new ways to wear scarves, sometimes it’s nice to switch gears and work on a different type of project.
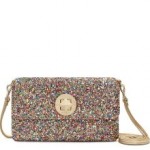
As a recent college graduate, I’ve got to make a pretty strict budget. I’ve never been able to afford some of the drool-worthy designer pieces that prickle your skin and get your heart racing so I always try and figure out how to make DIY versions. The Kate Spade Owl Purse is a bag I’ve been looking at for a long time. Not only is it way out of my price range, it is also unavailable! So a DIY was unavoidable.
How to make the Kate Spade Owl Purse:
For this DIY you need:
- Paper towels to make templates of wings
- Purse (I used the Ashton mini satchel.)
- Superglue
- Leather
- Beads or buttons for eyes
- Spray Paint
- Grommets
- Grommet puncher
- Patience :)
Step # 1: Cut out all the patches of leather that you need for the wings. I layered paper towels on top of the purse and cut templates to put on the leather. If you don’t want to use lots of leather, you can just cut one piece for the wing, but I like the layered effect that the real purse has.
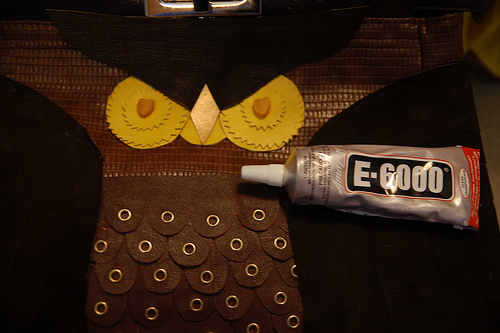
Step #2: Glue the wings on. I used the E-6000 superglue. This stuff is so great because it is flexible.
For the middle section, leave a bit of the wing unglued so that you can glue the little feathers underneath. To clamp down the superglue on the purse, I used an assortment of claw clips and bobby pins. They work really well even though it doesn’t really look too pretty. Let this dry, preferably overnight.
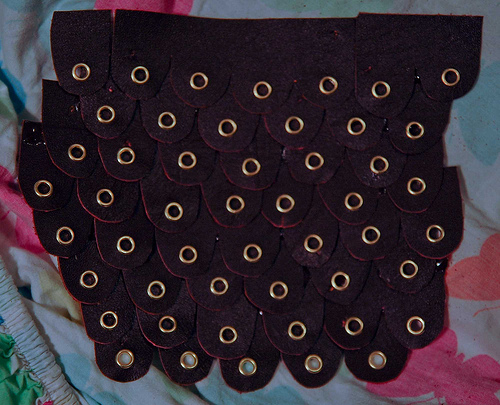
Step #3: Cut the feathers out of your leather scraps.
I cut little sections like that because I had these little leather remnants to use up, but I recommend cutting them in one strip. It makes it easier. After you have them cut out, punch the grommets into the feathers.
Step #4: After you have the grommets in the feathers, glue the feathers together so that they are one section. Don’t glue the bottoms of the feathers down to the purse. You want them to flap a bit. Don’t get your superglue on the suede, either.
Step #5: Cut out the eyes from the yellow leather
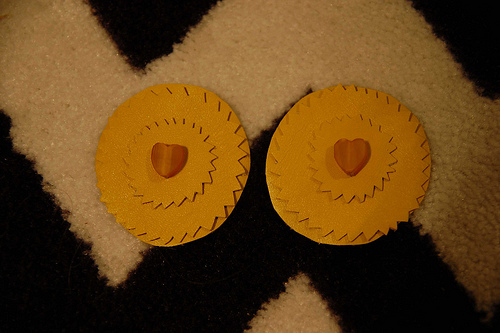
I notched little pieces out of the circles I cut for the eyes. Then I stitched the little yellow heart beads to one layer of the leather and then glued them all together.
Step #6: Cut out the triangular piece of leather that goes above the eyes of the owl. Glue this into place, leaving a little open on the bottom so you can slip the eyes in underneath to create the angry look that owls usually have. Put a bit of glue on the back of the eyes and then slip them under to make the cute angry owl face. Make sure everything is in its place. You can let these stages dry and then go back and touch parts up with a dab of glue. This is where patience comes in. Don’t hurry and mess it up. I’ve learned that lesson the hard way many times. :)
Step #7: Cut out the beak.
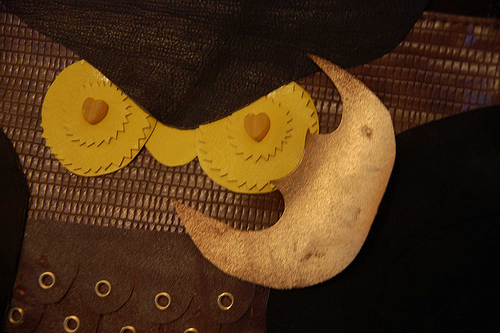
I didn’t have gold leather so I just took some gold spray paint and painted the suede side of a little snippet of leather. It worked really well, I am always surprised by how awesome spray paint is. Then you just need to cut out the diamond shape and glue it in place between the eyes.
Step #8: Glue everything down and make sure everything is going to stay. The thing about the E-6000 glue is that if there is enough glue there, it is not going anywhere. You just have to make sure it does not show.
Make sure the edges are down. This is where the claw clips come in handy. Thank you 1999 hairstyles. :)
And voila! Thanks again to Beth, Sarah, and Nate for letting me post today! You can pop over to my blog to see more DIY projects and crafts. :)